Laptop Charger Not Charging: How to Test the Adapter, Cable, and DC Jack
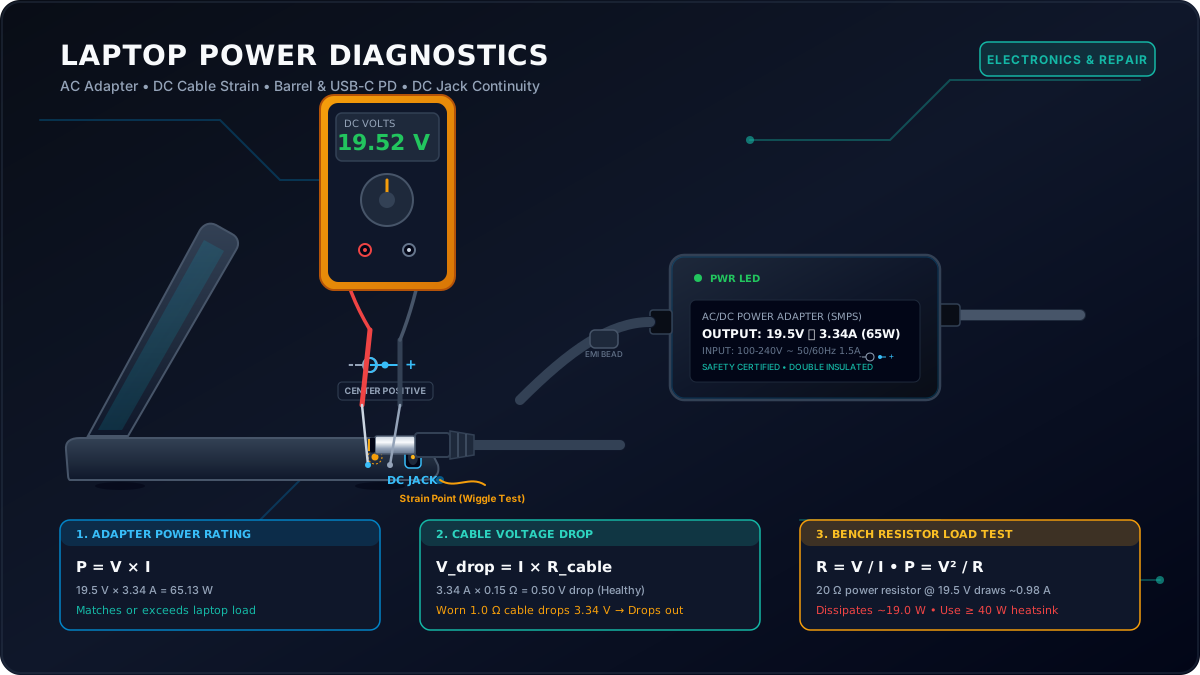
Picture a laptop that dies halfway through an evening shift after showing "plugged in, not charging" for an hour. The owner buys a new battery and a new adapter, about $120 in all, and the laptop still stays dark. It happens often enough, and the cause is frequently cheaper than either part.
A typical culprit is the thin cable just behind the plug. The adapter can read a steady 19.5 volts on a meter, then drop to 0.00 volts the moment you bend the cable an inch behind the strain relief. A few snapped copper strands are enough. The laptop, the battery and the adapter electronics were fine all along.
Guessing and ordering parts is the expensive way to fix this. The cheaper way is to work from the wall outward: outlet, mains cord, power brick, DC cable, plug or USB-C connector, the laptop's DC jack, and finally the battery. This guide shows how to read the charger label, measure the output with a basic multimeter, catch a cable that is failing, spot a worn jack, and recognize when the job belongs in a repair shop.
Contents in this Guide
- Sort the Fault in Five Minutes (Free Checks First)
- Safety First: Read This Before You Test Anything
- Reading the Charger Label (and Matching It)
- Testing the Charger Output with a Multimeter
- Testing the Cable and Plug
- Testing the DC Jack and Laptop Side
- USB-C PD and Smart-Charger Quirks
- Choosing a Replacement Charger
- A Repeatable Bench Workflow
- Common Mistakes That Ruin Your Diagnosis
- Interactive Tools and Bench Quiz
- Related ElectroLab Calculators & Guides
- Frequently Asked Questions
Sort the Fault in Five Minutes (Free Checks First)
The usual fear is a dead motherboard or a worn-out battery. In practice, many charging problems sit outside the laptop: a dead socket, a loose cord, a damaged cable. Spend five minutes on these free checks before you buy anything.
Outlet, Power Strip, and the Removable AC Cable
A surprising number of "broken chargers" are plugged into a dead outlet, a tripped surge protector or a loose power strip. Older wall sockets can lose their grip on the prongs. Unplug the charger and test that exact socket with a lamp or a phone charger you know works.
Then look at the mains cord between the wall and the brick. Most laptop adapters use a detachable lead with a 3-prong "cloverleaf" (IEC C5) or a 2-prong "figure-8" (IEC C7) connector. Packing it into a bag again and again can break the wires inside, or let the plug work halfway out of the brick. Push both ends in firmly. If a monitor or printer lead with the same connector is nearby, swap it in.
LEDs, Surface Heat, and Operating Odors
Lights, temperature and noise give you clues before you pick up a meter:
- Adapter LED: Many bricks have a small green or blue light. If it stays dark on an outlet you have checked, the brick has probably shut down or blown an internal fuse. A light that pulses or blinks rapidly often means the brick is repeatedly tripping its short-circuit protection, so the fault is in the cable or the laptop.
- Laptop charge LED: Watch it as you plug in. A few amber blinks, or a light that comes on for two seconds and goes out, usually points to a charger the laptop does not recognize or a battery that is almost empty. The manual for your model lists the blink codes.
- Temperature: A brick that is charging a laptop feels warm, often around 40 to 55°C. If it is stone cold after half an hour, it is probably not delivering any current. If it is too hot to hold, or smells of scorched plastic, unplug it.
- Noise: A faint high-pitched whine under load can be normal coil whine. Loud clicking, buzzing or sputtering suggests the supply is struggling, often from worn output capacitors or a feedback fault.
The Golden Bench Rule: The Known-Good Swap Test
Repair shops lean on the known-good swap because it is the fastest test there is. Borrow a compatible charger and try it on your laptop, or try your charger on a matching laptop.
Check three things first. The voltage must match within 5%, the polarity must match, and the current rating must be equal to or higher than what the laptop needs. A plug that fits the hole is not proof of anything.
| Symptom Observed | Likely Root Cause | First Thing to Check | Bench Difficulty |
|---|---|---|---|
| No lights on brick or laptop | Dead wall outlet, loose AC cord, blown primary fuse | Test wall socket with a lamp; firmly reseat C5 mains cable | Very Easy |
| Brick LED lights, but laptop has zero charge light | Broken DC cable wire, center pin broken, failed DC jack | Wiggle cable near plug; measure DC output voltage | Easy |
| Laptop displays "Plugged in, not charging" | Unrecognized ID pin, weak charger voltage, battery BMS lockout | Inspect center signal pin in plug; check BIOS battery status | Moderate |
| Charges only when cable is held at a specific angle | Fractured copper strands at strain relief, loose jack pins | Perform wiggle test while watching multimeter voltage | Easy |
| Charges for about 30 seconds, then drops out | Thermal shutdown, collapsing voltage under load, failing capacitor | Monitor output voltage while laptop initiates battery charging | Moderate |
| Adapter whines loudly or ticks continuously | Hiccup short-circuit protection, failing PWM feedback loop | Unplug from laptop; check if ticking stops when unloaded | Moderate |
| Power brick gets too hot to hold | Severely undersized replacement charger, shorted battery cell | Check label wattage against laptop specification | Easy |
| Laptop operates on AC power, but battery percentage stays flat | Depleted battery pack, blown motherboard charging MOSFET | Test battery health report in OS; inspect battery terminal pins | Moderate |
| BIOS warning: "Alert! Unrecognized power adapter wattage" | Severely bent center ID needle pin, severed middle communication wire | Look inside plug barrel with flashlight for a bent needle pin | Easy |
| Laptop charges very slowly | Using low-wattage phone charger on USB-C, throttling logic | Verify charger outputs 20V profile and at least 45W to 65W | Easy |
Safety First: Read This Before You Test Anything
Safety Notice
A laptop adapter is a sealed switch-mode power supply. It takes 100V to 240V AC from the wall and turns it into low-voltage DC, usually 19V to 20V. Measuring that DC output is safe if you are careful. The inside of the brick is not: it holds dangerous mains voltage and a charged capacitor.
Read these points before you pick up the probes. They protect you from shock, protect the laptop, and reduce the risk of a battery fire.
The Boundary Line: External Low Voltage vs Internal Mains Voltage
Everything in this guide stays on the low-voltage side: the output cable, the plug and the laptop's input jack. Never open, pry apart or probe inside a sealed mains adapter.
Inside, the mains side has a bulk capacitor charged to roughly 170 volts on 120V mains or 325 volts on 230V mains. A bleeder resistor normally drains it after unplugging, but a fault can leave it charged. The cases are also welded shut, and prying them apart ruins the double insulation, so the unit is unsafe even if you glue it back together. A dead adapter should be replaced and recycled through e-waste collection. If you want to understand how these supplies work, read the SMPS Repair & Troubleshooting Guide, which is background reading and not an invitation to open a brick.
Damaged Cords, Exposed Wires, and Tape Traps
If the cable has cracked insulation, exposed wire, a crushed case or scorched plastic around the wall prongs, stop using it. Do not wrap tape around a frayed DC cable and carry on.
When strands break, the few that survive carry the whole charging current, often 3 to 5 amperes. That turns the damaged spot into a small heater. Tape traps the heat, softens the insulation and can end in a short circuit that scorches a carpet, a laptop case or the brick itself.
Mismatched Voltages and Reverse Polarity Dangers
Never connect an adapter with the wrong voltage or reversed polarity. Most laptops have a reverse-polarity transistor on the input, but it is a last line of defense, not something to test. A 24V printer supply or a center-negative guitar-pedal supply on a 19V laptop can wreck the input circuitry and the board behind it.
Unattended Testing and Swollen Lithium Batteries
Do not leave a suspect laptop or hot charger running unattended on a bed, sofa or wooden desk. If the case is bulging, the trackpad is lifting, or the bottom panel looks warped, the lithium battery has swollen.
A swollen battery is a fire risk. Stop charging, shut the laptop down, unplug the adapter and take the battery to a battery recycling point or the manufacturer's service center. Do not try to charge it again or puncture it.
Preventing Multimeter Probe Tip Shorts
A slipped probe can bridge the center contact and the outer sleeve and short the output. Good adapters survive that, cheap ones may not. Use pointed probes, rest the plug on a clean bench, touch the black probe to the sleeve first, then bring the red probe to the center contact slowly.
Reading the Charger Label (and Matching It)
Every adapter has a printed label with a pile of logos and serial numbers. Only four things on it matter for matching: output voltage, output current, total wattage and the polarity symbol.
Voltage, Current, and Wattage Relationships
Wattage comes from one formula:
Power (Watts) = Voltage (Volts DC) × Current (Amperes)
Use these rules when matching a charger:
- Voltage must match closely. Stay within about ±5% of what the laptop specifies. For a 19.5V laptop, an adapter labeled 19.0V to 19.5V is fine. A 12V supply will not charge it, and a 24V supply can damage it. Some brands are fussier than 5%, so prefer the exact figure when you can.
- Current must meet or exceed. The amps on the label are the most the adapter can supply. The laptop draws only what it needs, so a laptop that asks for 3.34A works fine on a 3.34A, 4.62A or 6.15A adapter, and the bigger one runs a little cooler.
- Wattage follows the same rule. A 65W laptop can use an 85W, 90W or 130W adapter with matching voltage and connector. Going the other way, a 45W adapter on a laptop built for 90W will run hot, charge slowly, and may make the laptop slow itself down.
Worked Example A: Verifying Nameplate Wattage
Check the wattage on four typical labels:
- Business ultrabook charger: Marked
19.5V ƒ 3.34A.
Calculation: P = 19.5 V × 3.34 A = 65.13 W. A standard 65W supply. - Mid-range multimedia laptop charger: Marked
19.0V ƒ 4.74A.
Calculation: P = 19.0 V × 4.74 A = 90.06 W. A standard 90W adapter. - USB-C Power Delivery (PD) profile: Negotiated at
20.0V ƒ 3.0A.
Calculation: P = 20.0 V × 3.0 A = 60.00 W. A 60W USB-C supply. - High-power USB-C profile: Negotiated at
20.0V ƒ 5.0A.
Calculation: P = 20.0 V × 5.0 A = 100.00 W. This is the top of the 20V range; PD 3.1 adds higher voltages for chargers up to 240W.
Check your own numbers with the Ohm's Law & Power Calculator.
Plug Dimensions, Center Pins, and Polarity Symbols
Barrel plugs differ in outer and inner diameter. Common sizes are 5.5 × 2.5 mm, 5.5 × 2.1 mm, 4.5 × 3.0 mm (with a center pin) and 7.4 × 5.0 mm. Two plugs can look alike, yet forcing a 2.1 mm plug onto a 2.5 mm jack pin will bend or snap the contact, and a 2.5 mm plug on a 2.1 mm pin will fit loosely and arc.
The polarity symbol is a small diagram of a dot inside a ring with a plus and minus sign:
- Center-positive (nearly all laptops): The inner pin carries +, and the outer sleeve is the negative return.
- Center-negative (audio gear, some other devices): The center is the minus side and the sleeve is plus. Plug one into a center-positive laptop and you risk damaging its input circuitry.
USB-C Power Delivery (PD) and E-Marked Cables
More laptops now charge over USB-C. A barrel adapter puts out its full 19.5V as soon as it is plugged in. A USB-C PD charger starts at a low voltage, usually 0V with nothing attached and 5V once a device connects, and only moves up to 9V, 15V or 20V after the two sides agree on it.
That conversation happens over the Configuration Channel (CC) pin. For currents above 3 amperes, such as 100W at 20V × 5A, the cable also needs an e-marker chip in its plug. Use an ordinary 3A phone cable with a 100W charger and you will be held to 60W (20V × 3A), or sometimes to nothing.
| Label Parameter | What It Represents | Bench Matching Rule | Consequence If Mismatched |
|---|---|---|---|
| Output Voltage (V) | DC electrical potential supplied to motherboard | Must match laptop specification within ±5% | Too low: won't charge; Too high: destroys motherboard |
| Output Current (A) | Maximum continuous current the brick can deliver | Must be equal to or greater than laptop requirement | Too low: charger overheats, drops voltage, throttles CPU |
| Total Wattage (W) | Overall power output capacity (P = V × I) | Must be equal to or greater than original rating | Too low: slow charging, or battery drains under heavy load |
| Polarity Icon | Terminal assignment of inner pin vs outer sleeve | Must match identically (usually Center-Positive) | Reversed polarity can damage the input diode or MOSFET |
| Plug Outer/Inner Size | Physical dimensions of metal barrel connector | Must match exact millimeters (e.g., 4.5mm × 3.0mm) | Loose fit causes arcing; tight fit snaps center pin |
| Center ID Pin | Analog resistance or 1-Wire communication signal | Must match brand protocol (Dell, HP, Lenovo) | Laptop runs on AC but shows "Unrecognized Adapter" warning |
Testing the Charger Output with a Multimeter
Testing a charger with a digital multimeter takes a couple of minutes. An open-circuit reading is only the first step, though. You also need to know when a reading can mislead you and how to check the charger under load.
Multimeter Setup and Probe Placement
Set up the meter like this:
- Plug the black test lead into the COM (common ground) port.
- Plug the red test lead into the V/Ω/mA port.
- Turn the rotary selector knob to DC Volts (indicated by a capital
Vwith one solid line and one dashed line). If your meter is manual-ranging, select the 20V or 200V DC range. - Rest the barrel plug flat on a steady bench surface. Touch the black negative probe tip firmly against the outside metal barrel sleeve.
- Carefully insert the red positive probe tip into the center hole of the plug so it makes solid electrical contact with the inner metal spring or center pin. Ensure the metal shaft of your red probe does not touch the outer sleeve.
- Read the display. On a healthy center-positive adapter, you should see a positive number matching the label (such as
+19.5V). If the meter displays a minus sign (such as-19.5V), your probes are reversed or the adapter is center-negative.
Measuring No-Load Voltage
A charger plugged into the wall with nothing attached is running unloaded. A modern regulated supply should read close to its label, usually within ±2% to ±5%.
On a 19.5V adapter, anything from about 19.3V to 19.9V is normal. Old unregulated transformer adapters could read 20% high with no load, but modern switch-mode chargers regulate tightly even with no load.
Why No-Load Voltage Can Lie to You
Here is the catch. A multimeter draws almost no current (roughly 2 microamperes at 19.5V through its 10 megohm input), so a weak supply can still read a perfect voltage.
A supply with worn output capacitors or high internal resistance can manage 19.5V into a meter, then sag toward 5V or 0V when the laptop asks for 3 amperes. An adapter that reads correctly on the bench can still fail in use. That is why a load test matters.
A Simple Bench Load Test with a Power Resistor
A dummy load test shows whether the adapter holds its voltage while delivering real current. Connect a wirewound or aluminum-housed power resistor across the output while you watch the meter.
Worked Example B: Calculating a Safe Bench Dummy Load
Say you want to load a 19.5V adapter with roughly 1 ampere:
- Resistance: By Ohm's Law, R = V / I = (19.5 V) / (1.0 A) = 19.5 Ω. A 20 Ω power resistor is easy to find and close enough.
- Load current: I = V / R = (19.5 V) / (20 Ω) = 0.975 A (roughly 1 A).
- Heat in the resistor: P = V2 / R = 19.52 / 20 = 380.25 / 20 ≈ 19.01 W.
- Power rating: A resistor dissipating 19 W should be rated for about twice that. Choose a wirewound resistor rated 40W to 50W and bolt it to a metal heatsink.
Procedure: Connect the 20 Ω resistor across the plug for 5 to 10 seconds while watching the meter. A healthy adapter holds roughly 19.0V to 19.5V. If it falls below about 17.5V or shuts off, the adapter is worn out. Note that 1 A is only about a third of a 65W adapter's capacity, so passing this test is encouraging, not proof. The resistor gets very hot in seconds, so do not touch it.
Testing USB-C Power Delivery Adapters
You cannot just push probes into a USB-C plug and expect 20 volts. The charger needs a digital handshake over the CC pin before it opens the higher-voltage rail.
Use an inexpensive inline USB-C PD tester, or a "trigger board" set to 20V. It sits between the charger and a load and shows voltage and current on a small display. If a charger cannot give even 5V through one, the charger has failed.
| Multimeter Reading | Electrical Meaning | Likely Root Cause | Recommended Next Step |
|---|---|---|---|
| 0.00 V (Dead Flat) | Zero electrical potential at connector | Severed DC cable wire, blown internal mains fuse | Perform cable continuity check; test AC line cord |
| Nominal unloaded, but drops heavily under load | High internal resistance, collapsing output | Dried-out electrolytic output capacitors, weak PWM | Replace adapter; see SMPS repair guide for bench theory |
| Steady voltage within 2% of the label | Healthy power regulation stage | Adapter electronics operating normally | Perform cable wiggle test; inspect laptop DC jack |
| Voltage reads 5% to 10% high (e.g. 21.2V) | Slightly elevated regulation threshold | Normal on some unloaded OEM units; or drifting feedback resistor | Verify if voltage stabilizes when mild load is applied |
| Voltage flickers wildly between 0V and 19V | Intermittent physical contact or tripping protection | Fractured copper strands in cable; cyclic short circuit | Gently flex cable along its length to locate the break |
| Negative voltage reading (e.g. -19.5V) | Reversed electrical polarity | Multimeter probes inverted, or center-negative adapter | Verify probe ports on meter; re-check label polarity symbol |
| Reads 19.5V only when cable is pulled sideways | Fatigued copper wire inside strain relief boot | Mechanical flex fatigue right at the plug entrance | Replace DC cord or replace complete adapter assembly |
Testing the Cable and Plug
Damaged cables are among the most common ways chargers die. People wrap the cord tightly around the brick, yank the plug out by the wire, or let the laptop's weight bend the cable over a table edge. After thousands of flexes, the copper strands fatigue and snap.
The Wiggle Test
This is the most revealing physical check you can do:
- Plug the adapter into the wall.
- Connect your multimeter probes steadily across the output barrel plug (red to center, black to outer sleeve) so the display shows the normal voltage (for example 19.5V).
- Keep the probe tips still and use your other hand to bend the cable where it enters the plug's rubber strain relief. Flex it left, right, up and down.
- Next, wiggle the cable where it exits the main body of the plastic brick.
- Watch the display. If it drops to zero, flickers or stutters, even briefly, a conductor is broken at that spot.
Testing Cable Continuity with an Ohmmeter
You can also check a cable with the adapter unplugged, using continuity or resistance mode. Unplug the adapter from the wall and wait two minutes first.
- Set your meter to Continuity (the sound-wave icon) or the lowest Resistance (Ω) range.
- Touch the probes together. The meter should beep and read well under
0.5 Ω; note that figure and subtract it from later readings. - This works on a detachable cord or a spare cable, where both ends are accessible. Probe from one end of a conductor to the other. A healthy wire reads a fraction of an ohm, certainly under
0.2 Ωafter you subtract the lead reading.
Understanding Voltage Drop in Degraded Cables
A damaged cable does not always fail outright. Often most of the strands are broken and only a few thin ones remain, so the cable still conducts but its resistance has climbed.
Worked Example C: What Cable Voltage Drop Does
Ohm's Law (V = I × R) and the heating formula (P = I2 × R) show what that does:
- Healthy cable: A thin 1.5-meter laptop cable, counting both conductors and the plug contacts, might total about 0.15 Ω of loop resistance.
Under a charging current of 3.34 A:
Voltage Drop: Vdrop = I × R = 3.34 A × 0.15 Ω ≈ 0.501 V (about 0.50 V).
Power Wasted as Heat: Ploss = I2 × R = 3.342 × 0.15 ≈ 1.67 W.
Outcome: A 19.5V adapter delivers about 19.0 V to the laptop and the cable stays cool. - Worn cable: Most strands have snapped and the loop resistance has risen to 1.0 Ω.
Under the same 3.34 A:
Voltage Drop: Vdrop = I × R = 3.34 A × 1.0 Ω = 3.34 V.
Power Wasted as Heat: Ploss = 3.342 × 1.0 ≈ 11.2 W, concentrated in the weak spot.
Outcome: The laptop sees 19.50 − 3.34 = 16.16 V. It may refuse to charge, cut the charge current, or show "plugged in, not charging", and the damaged section runs hot.
Try your own resistance values with the Voltage Drop Calculator and Ohm's Law Calculator.
| Cable Bench Check | Healthy Reading | Faulty Reading | Diagnostic Meaning |
|---|---|---|---|
| Live Wiggle Test at Plug Boot | Constant voltage (e.g. 19.5V ±0.05V) | Voltage drops to 0V or jumps erratically | Copper fatigue fracture inside plug strain relief |
| Live Wiggle Test at Brick Exit | Constant voltage without flutter | Intermittent voltage dropouts | Broken conductor inside brick exit grommet |
| Conductor Resistance Check | Under 0.2 Ω end-to-end | Above 1.0 Ω or Open Loop (O.L) | Severed or severely bottlenecked copper core |
| Outer Jacket Visual Inspection | Smooth, flexible rubber, no bulges | Kinked, twisted, swollen, or split sleeve | Internal copper bunching or insulation breakdown |
| Center Pin Isolation Test | Infinite resistance (∞ / O.L) to sleeve | Beeps continuity / under 100k Ω | Internal insulation short circuit between positive and ground |
Testing the DC Jack and Laptop Side
If the adapter holds its voltage under load and passes the wiggle test, the fault is probably in the laptop. A worn DC input jack is the usual suspect.
Visual and Physical Inspection
Look into the charging socket with a bright flashlight:
- Wobble: Insert the plug. It should seat firmly with very little play. If it rocks like a spoon in a cup, the jack's spring contacts have lost tension.
- Center pin: On Dell and HP style jacks, look at the thin pin in the middle. Bent sideways, or missing? A trip over the cord can snap it off and leave it stuck inside the plug.
- Lint and dirt: Laptops carried in bags collect pocket lint and pet hair in the jack, and that can stop the plug from seating fully. Pick it out with a wooden toothpick, with the laptop shut down and unplugged. Never use a metal pin or paperclip.
- Burn marks: Discolored or melted plastic at the port entrance means a poor connection has been getting hot under charging current. Stop using that jack.
Motherboard Solder Joints vs Cable-Harnessed Jacks
Laptops mount the jack in one of two ways:
- Cable-harnessed jack: A separate plastic module screwed into the chassis and joined to the motherboard by a short plug-in harness. Replacing it is usually cheap, needs no soldering, and is within reach of a careful DIYer who follows the model's service manual.
- Soldered jack: The jack is soldered straight into the motherboard. Every tug on the cord stresses the solder joints, and hairline cracks follow. Fixing it means desoldering and resoldering on the board, which is a job for someone with the tools and practice.
When the Problem Is the Battery or Motherboard
If the jack is tight, voltage reaches the board and the laptop still will not charge, the fault is in the charging circuitry:
- Over-discharged battery: A battery left empty for months can fall below its safe cell voltage, roughly 2.5V to 3V per cell. Its protection circuit may then lock it out, and many packs will not charge again. Replace it with the correct part.
- Failed input MOSFETs: Laptop inputs often use a pair of MOSFETs for reverse-polarity protection and switching. If one shorts or does not get its gate signal, adapter power never reaches the rest of the board. Our guide on Testing MOSFETs, Transistors & Diodes with a Multimeter covers the meter checks.
- Embedded controller faults: The EC chip watches for the adapter, temperature and battery communication. If its firmware crashes or the chip fails, charging can be blocked. Board-level repair is a job for a repair shop.
USB-C and Smart-Charger Quirks
Charging is more complicated than it used to be, because laptops and chargers now talk to each other. Knowing the main quirks saves a lot of guessing.
The Center ID Pin (Dell & HP Three-Wire Systems)
Many Dell and HP barrel chargers have a thin pin in the middle of the plug. It is easy to assume the pin carries the power. It does not. It is a data line, and the power and return use the barrel contacts around it.
Inside the brick, a small 1-Wire memory chip (a DS2501-type part) stores the charger's wattage. The laptop reads it at plug-in. If the pin is bent or dirty, or the thin ID wire in the cable has broken, the laptop shows a warning that the adapter type cannot be determined. It will usually run on AC but refuse to charge the battery, or charge it slowly.
Phone Chargers on Laptops
A phone charger and a laptop charger share the same USB-C port shape, but a laptop usually wants the 20V Power Delivery profile. A charger that offers only 5V, 9V or 12V is ignored by the laptop, or triggers a "slow charger" warning. Even one that offers 20V at 30W may only trickle-charge a laptop that is busy.
BIOS Battery Health and Conservation Modes
Before you blame hardware, check the maker's battery software (such as Lenovo Vantage, Dell Power Manager or ASUS Battery Health Charging). Many laptops have a conservation mode that stops charging at 60%, 80% or 85% to protect the battery. If the message appears at exactly 80%, the laptop is behaving as set.
Choosing a Replacement Charger
Once you have confirmed the adapter is dead, pick the replacement with care. Poorly made counterfeit adapters are common, and they often skip safety features.
OEM vs Certified Third-Party vs Unbranded Clones
Buy the laptop maker's own adapter if you can, or one from an established brand that lists its specifications and carries real safety listings. For USB-C, choose a charger that explicitly offers the 20V profile at your laptop's wattage.
Be wary of unbranded $15 "universal" chargers. Cheap units often cut corners on input protection, wire gauge and filtering, and their noisy output is a known cause of trackpad glitches while charging. Low price and no name is the combination to avoid.
Safety Certification Marks
Look for recognized safety marks, and remember that counterfeit marks exist:
- UL / cUL: Independent safety listing for North America.
- CE marking: The manufacturer's declaration of compliance for the European market; it is not an independent test by itself.
- TÜV Rheinland / GS: German third-party safety certification.
- Double square symbol: Class II double insulation, so the unit does not rely on a mains earth connection.
| Selection Parameter | Matching Rule | Why It Matters to Laptop Health |
|---|---|---|
| Output Voltage (V) | Exact match (±5% tolerance) | Prevents undervoltage shutdown and overvoltage destruction |
| Current Output (A) | Equal to or higher than original | Ensures power supply runs cool without thermal stress |
| Connector Dimensions | Exact millimeter barrel size | Prevents broken socket pins and arcing |
| Polarity Orientation | Exact match (Center-Positive) | Reversed polarity destroys motherboard input circuitry |
| Smart ID Support | Compatible communication protocol | Enables battery charging on Dell, HP, and Lenovo machines |
| Safety Certifications | Recognized safety marks (UL, CE, TÜV); FCC covers radio noise only | Indicates testing for isolation and fire safety, though fake marks exist |
A Repeatable Bench Workflow
Work through these nine steps in order. Stopping at the first one that fails saves time and money:
- Check the outlet: Plug a known-working lamp or phone charger into the wall receptacle to confirm live power.
- Inspect for damage: Check for cracked plastic casings, chewed cords, melted plugs, bent prongs, and swollen laptop chassis.
- Read the lights: Note whether the adapter brick LED and the laptop charging LED light up, stay dark, or blink in hiccup mode.
- Note the label: Record the rated output voltage, current capacity, total wattage, and polarity symbol from the label.
- Measure unloaded voltage: Insert the red probe into the center and touch the black probe to the sleeve. Confirm the reading matches the label within ±5%.
- Do the wiggle test: Gently flex the cable near the plug strain relief and the brick exit while watching the DMM for voltage fluctuations.
- Run a dummy load test if you can: Apply a 20-Ohm wirewound power resistor across the output for 5 seconds to verify that voltage does not collapse under load.
- Examine the DC jack: Use a flashlight to check for bent center pins, loose mechanical fit, broken plastic collars, and compacted pocket debris.
- Swap in a known-good charger: If all tests pass but charging fails, test the laptop with an identical verified charger or test the battery health status in the OS.
Common Mistakes That Ruin Your Diagnosis
These eleven mistakes waste money or cause damage:
- Replacing the battery first: Buying an expensive battery before testing whether the charger actually outputs voltage to the laptop.
- Matching only the barrel plug size: Forcing a 12V router adapter into a 19V laptop simply because the circular connector physically fits.
- Ignoring the polarity symbol: A center-negative adapter can damage the laptop's input protection.
- Using an underpowered phone charger for laptop gaming: Expecting an 18W USB phone plug to keep up with a 100W gaming laptop.
- Prying open the plastic adapter brick: Opening a sealed mains supply exposes you to shock and stored charge.
- Taping over frayed wires: Tape traps heat in the broken strands and can lead to a short.
- Shorting the output as a "spark test": Touching the leads together can damage the adapter. Use the meter.
- Skipping the wall socket: Two hours of testing, then you find a tripped breaker.
- Running an undersized charger long term: A 45W adapter on a 90W laptop works near its limit and can overheat.
- Yanking the cable to unplug the laptop: Pulling the flexible wire instead of gripping the plastic plug collar, causing flex fatigue fractures.
- Burying the brick under blankets: It cannot shed heat and may shut down or overheat.
Interactive Tools and Bench Quiz
Interactive Tool 1: Charger Label & Power Decoder
Enter the rated DC Output Voltage and Output Current from your adapter nameplate to calculate wattage, classify charger tier, and verify polarity guidelines.
65.13 Watts DC
Calculated via P = V × I (19.5 V × 3.34 A). This power supply belongs to the ubiquitous 65-Watt business ultrabook category. You may safely substitute a 90W or 130W supply with matching 19.5V voltage.
Interactive Tool 2: Cable Drop & Bench Load Estimator
Calculate voltage drop and power loss across a worn charging cord, plus determine the exact resistance and wattage rating needed for a bench dummy load test.
Bench Dummy Load Specifications (~1A Target):
Connect a 20.0 Ω power resistor. It will draw 0.98 Amps and dissipate 19.0 Watts. Select a resistor rated for at least 40 Watts mounted on a heatsink.
Bench Diagnostic Knowledge Quiz
Try five common charger scenarios. You get feedback as soon as you pick an answer.
1. An adapter label reads "Output: 19.5V ƒ 3.34A". Approximately what total wattage is this power supply designed to provide?
2. A laptop charger reads a perfect 19.5V on a multimeter, but the laptop shuts down the moment it is plugged in. What is the most likely electrical explanation?
3. Why does a standard smartphone USB-C charger fail to charge most modern business laptops?
4. Your original laptop charger is rated 19.5V, 3.34A (65W). Your colleague offers you a spare charger rated 19.5V, 4.62A (90W) with identical plug size and center-positive polarity. Is it safe to use?
5. On a Dell or HP laptop, what does the needle-thin metal pin inside the center bore of the barrel connector do?
Related ElectroLab Calculators & Guides
More calculators and guides on power electronics:
Ohm's Law & Power Calculator
Work out voltage, current, resistance and power for an adapter, a dummy load or a cable drop.
What Does a Laptop Cost to Charge?
A quick estimate of the monthly running cost, and of the energy lost inside the adapter:
Worked Example D: Monthly Energy Cost and Power Adapter Efficiency
Take an office laptop that averages 45 W and runs 4 hours a day:
- Daily Energy Consumption:
Eday = 45 W × 4 h = 180 Wh = 0.18 kWh/day. - Monthly Energy Consumption (30 Days):
Emonth = 0.18 kWh × 30 = 5.40 kWh/month. - Monthly Electricity Cost (at $0.15 per kWh benchmark):
Cost = 5.40 kWh × $0.15 per kWh = $0.81 per month. (Your local tariff will differ.) - Power Adapter Efficiency Losses:
A good adapter might be about 88% efficient (η = 0.88). If it delivers its full rated 65 W, the wall supplies:
Pin = Pout / eta = (65 W) / 0.88 ≈ 73.86 W (roughly 73.9 W).
Power dissipated as heat inside the brick: Plost = 73.86 W - 65.0 W ≈ 8.86 W (about 8.9 W). That lost power is why bricks feel warm. The 45 W figure above is what the laptop uses; the wall supply draws a bit more, about 45 / 0.88 ≈ 51 W, or roughly $0.92 per month at the same tariff.
Estimate the cost of other appliances with the Appliance Energy Cost Calculator and Electricity Bill Calculator, or learn how utility meters track real loads in our Electricity Meter Reading Guide.
Related Practical Electronics Guides
Frequently Asked Questions
Why is my laptop plugged in but not charging?
When Windows or macOS says "plugged in, not charging," the laptop sees power at its input but is not charging the battery. Common causes are a broken ID wire in a Dell or HP style cable, an adapter whose voltage sags under load, a worn-out battery, or a battery-health mode that holds charge at about 80%.
How do I test a laptop charger with a multimeter?
Set the meter to DC volts (20V range). Touch the black probe to the outer metal sleeve and gently put the red probe on the center contact. A healthy charger reads within about 5% of its label (for 19.5V, roughly 18.5V to 20.5V) and stays steady. Flex the cable while you hold the probes in place.
How do I know if my laptop charger is bad?
Suspect the charger if it reads zero volts, if the reading flickers when you flex the cable, if it stays completely cold while connected, if its LED blinks rapidly, or if it squeals. A charger that reads 19.5V unloaded but falls below about 17.5V with the laptop connected is worn out, often because of its output capacitors.
Can I use a charger with a different wattage?
A higher wattage charger is fine if the voltage, polarity and connector match. A 90W charger can replace a 65W one, because the laptop draws only what it needs and the brick runs cooler. A lower wattage charger (45W in place of 90W) may run hot, charge slowly and slow the laptop down.
Can a phone charger charge a laptop?
Usually not well. Many phone chargers stop at 5V, 9V or 12V and 10W to 30W, while most laptops want a 20V Power Delivery profile and often 45W to 65W or more. A low-power charger may trickle-charge a small laptop that is switched off, or do nothing at all.
How do I tell if the DC jack is broken?
A failing DC jack shows up as a plug that wobbles in the socket, charging that only works when the cable is held at an angle, melted plastic around the port, or a center pin that has snapped off inside the plug. On soldered jacks, cracked joints can stop power reaching the board.
What does "center positive" mean on a charger?
Center positive means the inner contact of the barrel plug carries the positive voltage (for example +19.5V) and the outer metal sleeve is ground (0V). Nearly all laptops use this arrangement. A reversed-polarity supply can damage the laptop's input circuitry.
Is it safe to repair a laptop charger by opening it?
No. A laptop power brick is a sealed unit that works from mains voltage (100V to 240V AC) and contains a large capacitor that can stay charged after unplugging. Opening the welded case also ruins its double insulation. Replace a damaged adapter and recycle the old one.
If the battery icon sits at 2% and nothing is charging, work from the wall outward before buying a battery. Check the outlet, inspect the cable near the plug, and do the wiggle test with a meter. Then check the label against the laptop's requirements with the Ohm's Law & Power Calculator. A few minutes of testing usually beats a day of guessing.